
I’ve been quiet ’round these parts because I have been working furiously behind the scenes on a project that I hope you will see soon. Meanwhile, we are all enduring COVID-19 in various ways. I hope everyone is adjusting fine, is staying healthy, and is convincing their social circles the importance of social distancing. As for me, my life has changed little – I already self-identify as a hermit, boy already shops like its Doomsday, and on top of working alone, our job is defined as “essential business” so we keep on keeping on. There is a lot of tension in the air, regardless, so I haven’t felt the mindspace for much organic creativity. And that is when I turn to things with hard and fast rules.
Boy got me a paint-by-numbers (PBN) for winter solstice last year, and so I started it! You may remember my previous PBN: railbirds. I had no real experience in painting before (of course, my childhood included watching Bob Ross on tv and playing around here and there throughout the years). I struggled a lot in the beginning with many frustrations. But since some of you are bound at home and may want to try your first PBN (which can be found all over the internet shops), I thought I’d document a little about what I find to be useful, and show you how one can progress from pretty awful looking pictures to something you can actually be proud of. Just remember, I am not an expert! And also note that PBN won’t really teach you how to paint in general. It’s a different beast at the start.
Paint-by-numbers Tips:
A PBN usually includes the canvas, “prepped” for painting (as in, gesso has been applied to the fabric so it feels a little plastic-y); paint brush(s); and paint pots. My sample size is only two, but I can tell a difference between qualities of the railbirds kit and the totoro kit (which, by the way, if you need an introduction to totoros, go here). Specifics don’t matter here, unless you wanted a review of these two particular kits – which I am not focusing on – so instead I will just mention what to consider in quality. There are three problems I’ve discovered, and you are likely to run into at least one!
Let’s begin with gesso – the idea is that it seals the fabric to prevent the paint from spreading like a wet ink blot on paper. The paint should glide across the surface, too. If your paint isn’t gliding, it might be caused by the gesso. Maybe it is too tacky, or not thick enough so the paint is getting caught on the weaves of the fabric. A quick fix is to first paint the area that you are working on with water to give it a little moisture. You don’t want it wet – you just want to see it barely glisten in the right light.
A second issue that results in the paint not gliding is the quality of the paint itself (or a combination of paint and gesso). It’s always best practice to use a toothpick to stir the pot. But even so, quality can’t be cured by a stir! I’ve seen paint pots that are nearly water in texture, as well as paint pots that felt like someone left it open overnight, almost like wet puddy. Really thin paint will simply require many, many coats. But the other kind of paint, which sadly appears to be the norm, needs help. You can probably add a small dose of baby oil, but I just use water for easy clean up. One must be careful, though, so that it doesn’t become too thin! I would never suggest adding water directly to the pot. Instead, find an easy-to-clean dish or buy a little paint mixing tray (I have one and love it!). See, the thing is, the kits are sometimes really stingy on how much paint you get so do your best not to waste any. I simply take out a little dab and while its on my brush, I dip it in water, then squish it around in the mixing tray, adding more paint or water as needed to get the right glide + coverage combination – when possible. And always expect to have to paint the same area multiple times for coverage. Why they don’t use a color printer to stamp the design, I will never know.
Also in speaking of paint – don’t expect the numbers to match the example photo. You need green #14, but “green” #14 is actually red? Happens. In the totoro kit, they marked the pots backward, so I had to remark them with a sharpie – and even then, some of the color choices are questionable. I might have to mix my own colors by the end. It happens. Expect it.
And the third issue? Quality of brushes. Sometimes a kit is well stocked with multiple sized and shaped brushes, packed well for shipping, and tight bristles all around. Sometimes a kit comes with a single brush, too big for fine details, bristles bent every-which-way from packaging, which fall out promptly upon use… just bad news all over the place. If your brush stinks, you’ll hate painting. Find a decent brush set before you pull out your hair and toss the project!
There are many ways to approach painting. For starters, however you choose, always begin adding paint to the canvas starting from the top working down, and from the left to right (if you are right-handed like me) so that you don’t accidentally smudge wet paint as you go. So with that in mind, some people will opt to add color based on paint pot sequence – coloring all the 1s, then the 2s, and so on. Some will opt to pick a quadrant and paint it all in before moving to the next. Some will start with the tiny and work to the large, or vice versa. Others will work the background and continue forward. That is the method I learned with the birds, though here I chose differently. I chose to begin with the biggest element to feel progress! (What is painting and art if not the need to meet the artist’s emotional requirements, eh?)
And painting isn’t like using a marker. It is more like using a calligraphy pen. You’ll have to make tiny scratch marks more than long lengths. The length depends on the size of the brush, but at this scale, probably never more than an inch. Get use to dipping your brush back in the paint often. The tinier the brush, the pointier the brush? The more dips, more often!
My Totoro Canvas:
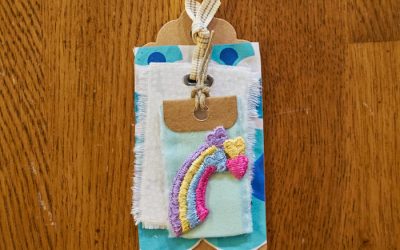
So this is where I began, with a “blank” canvas ready to work. I have the paints, a small jar of water, a few brushes, a mixing tray, a paper towel, and a toothpick. I also have an easel, which had a learning curve, but I now prefer vertical painting – super unnecessary though. I have the Kingdom: Two Crowns soundtrack playing (the most recent game obsession of mine) and and I get to work!
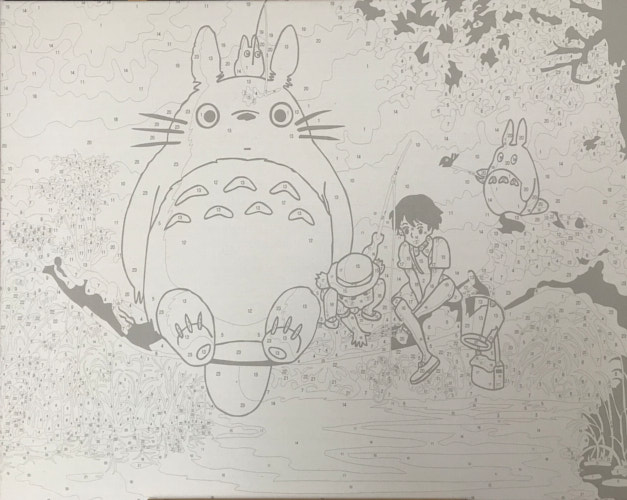
This one comes with the black areas already filled, to help shade it in I guess. I realized that painting a cartoon is actually more troublesome than the realistic birds because I can’t really fudge lines as much. I am so not looking forward to adding the black outlines at the end!
After day 1:
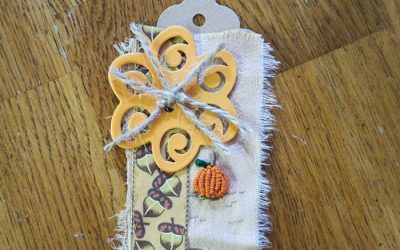
You’ll see at first it looks like poop. The paint is splotchy and isn’t covering the marks. But you must have faith to continue on! You must endure coat, after coat, and know that it will be worth it in the end. I’m terribly disappointed in the white coverage, as I suspected, so I will keep adding coats every day before I begin other colors.
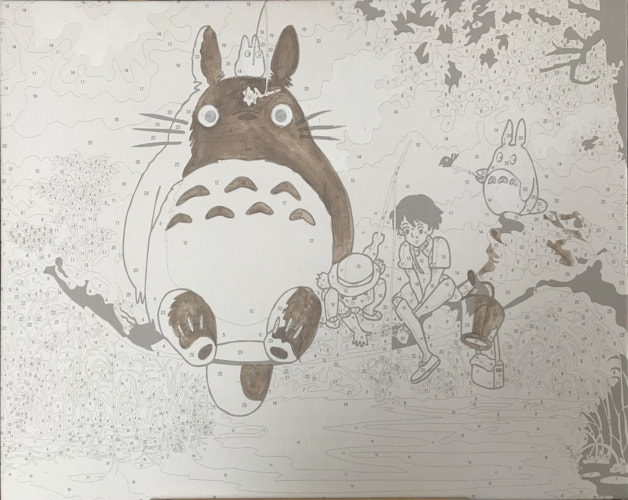
Day 2:
The greyish #13 gets a second coat, while I add a dark brown #23. I will make the totoro and bucket solid in paint color, but I will care less about the other areas until I get the surrounding colors in place. I am thinking of background and foreground. I add color now to the dark areas because I know they will take more than one coat, but I also know that they will cover lighter surrounding colors easier than lighter colors covering them. Mistakes will be made, so I find the balance of color choices. Everything will get a few coats, but their order to reach final coat will vary.
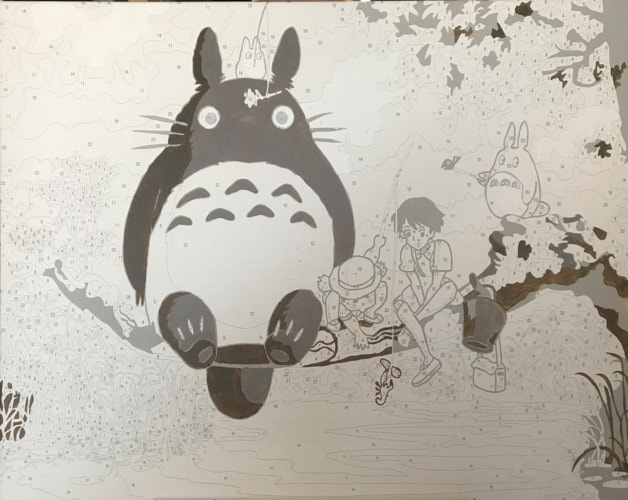
Day 3:

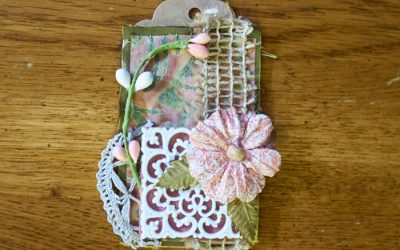
The grey got another coat around the totoro, and I found 13s and 23s in a few more places. The brown in the totoro got another coat – might still need a third. The orange color isn’t covering at all. I didn’t have to water down the red, but it also isn’t covering. And that yellow belly…. I wonder how many coats it will take? I wonder if the color will actually look like it is correct by the time all this is through. Regardless, I know I will achieve the results I want if I just keep on keeping on. Persevere, I say!
You’ll maybe notice I don’t do a whole lot in a single day. Well, I don’t “like” painting the way I like other crafts. I don’t get lost in it. So, a little here and there – and that’s all anything ever needs! “Yard by yard, life is hard. Inch by inch, life’s a cinch!” 😀
I will post again with a little more progress as the days build. Stay safe out there!

0 Comments