
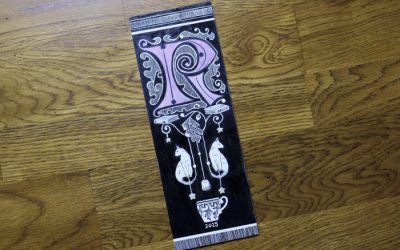
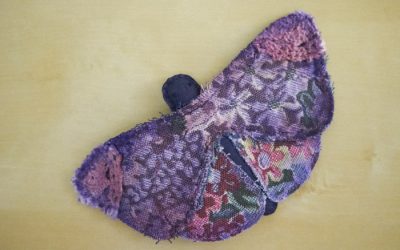
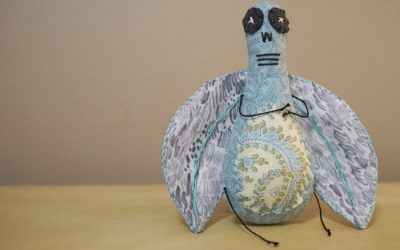
Since 2020, I have been a part of Stitch Club (as a founding member), brought together by TextileArtist.org, and when I was introduced to Mandy Pattullo‘s work, I was enthralled. You might recall that I created a textile book under her direction. Her second workshop was to create a robin using collage – only, instead of pieces of paper, we were to use tiny bits of fabric scraps. Because I loved her work so much, I felt – gasp! – daunted for the very first time. It was meant to be a bird upon a simple background, but with two years of this percolating in my subconscious (and me being me), it transformed into this lovely banner.

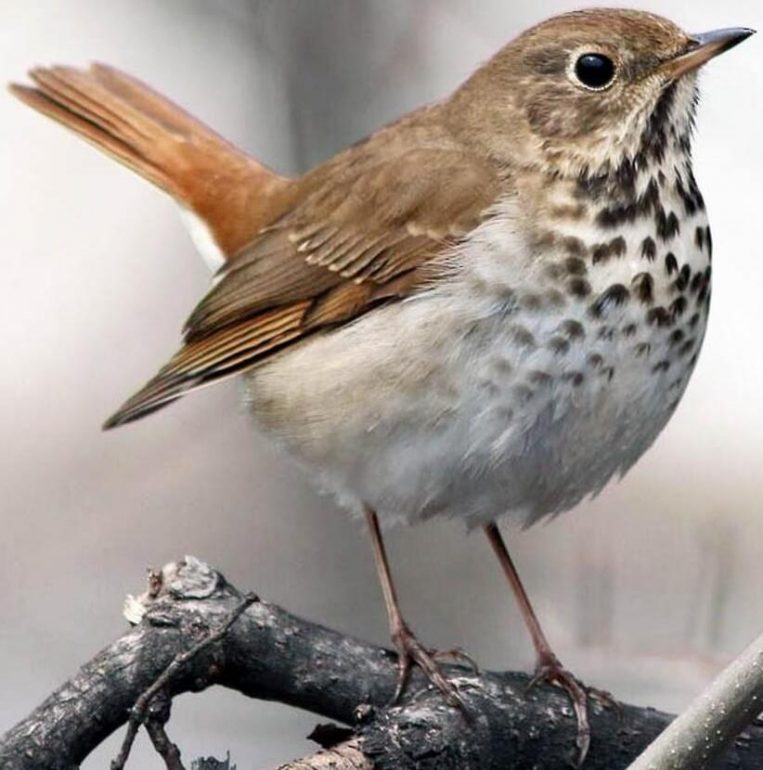
While Mandy suggested a robin, I chose a thrush instead to go along with a poem I was introduced to by artist Ann Wood (more on that later). At first, I worried I didn’t have the right colors and that is perfectly okay for the style, but it was one of the reasons I was holding off on beginning the project. This is the original image of a Hermit Thrush I worked from, which I scooped up from AllAboutBirds.org here, and flipped horizontally.
Mandy stitches the collage directly to the background, but at this stage, I hadn’t figured that out what I’d use for that yet, so I opted to stitch directly to interfacing. I cut this out later to tack onto the background. Had I thought about it, I could have done the wing separately, to add greater 3D effect.
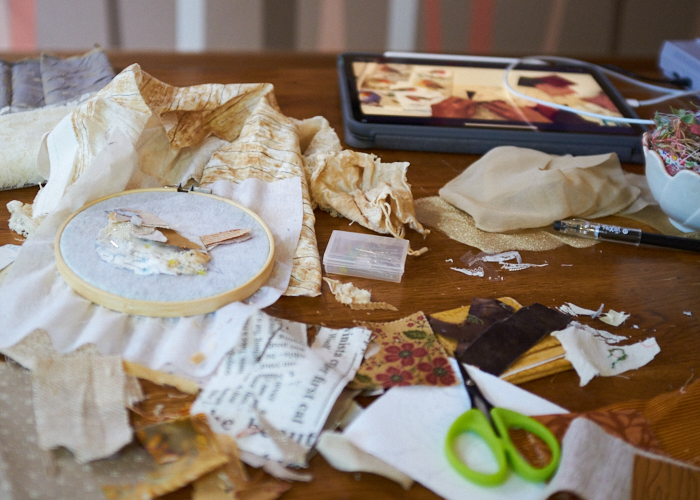
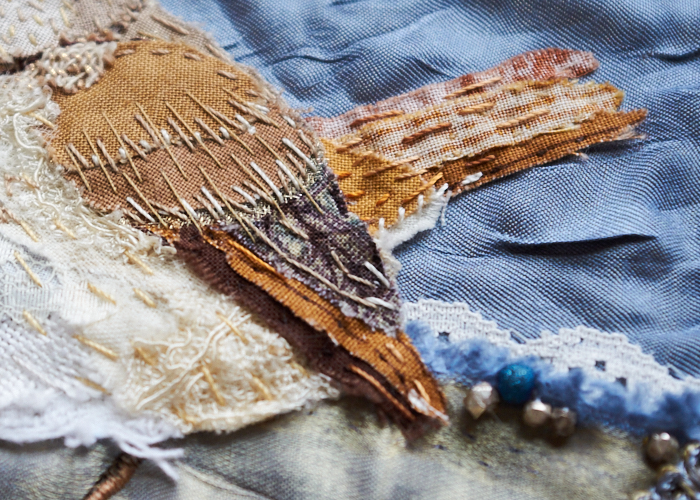
I chose scraps of quilter’s cotton, canvas, linens, modern lace, pantyhose, and some lace from an antique wedding gown I have used before (in another favorite Stitch Club project!) and followed Mandy’s tutorial. Sometimes, I used the back of the fabric to tone down the colors, which was done with the darkest browns and those on much of the tail.
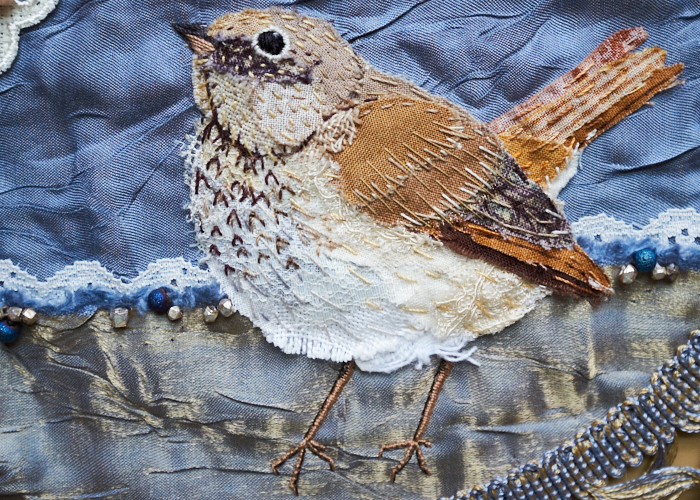
Then, I added the features I needed to make the bird come to life: a padded satin stitch eye using glossy black thread with a tiny sparkly white colonial knot, surrounded by a circle of tiny satin white stitching. I added a few running stitches for the “chin” features, and then a bunch of small fly stitches for the markings on the chest.
Next came lots of straight stitches, long and short, and in both perle cottons and quilter’s thread in a few colors across the whole bird.
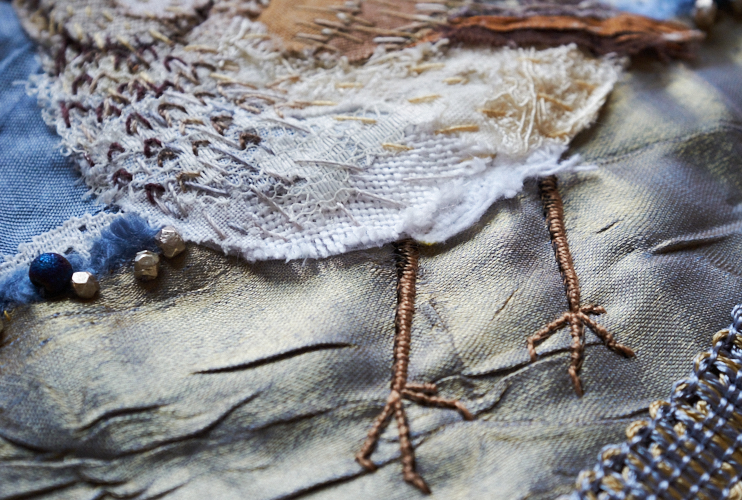
Almost at the very end, I had to come to terms with adding the beak and legs. Of course, I began with the beak because it was easy enough. Mandy uses what I call “sketch” stitches in her work (straight stitches that give a hint of the design), but I chose to instead use padded satin stitching for the legs and feet with a Sulky thread and then shadow it with some thinner thread and backstitching.
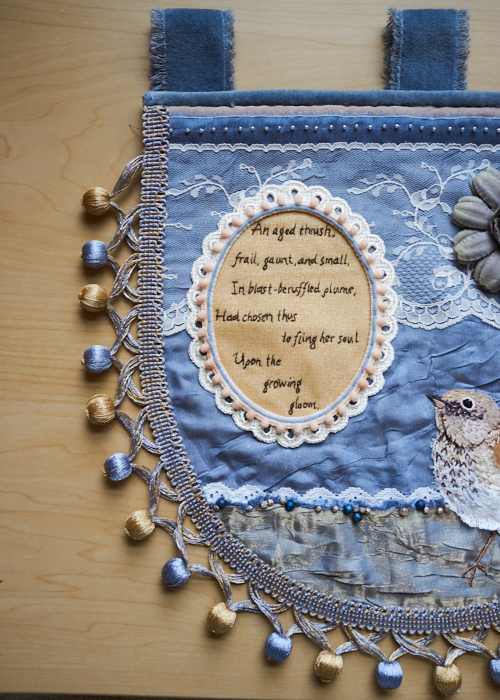
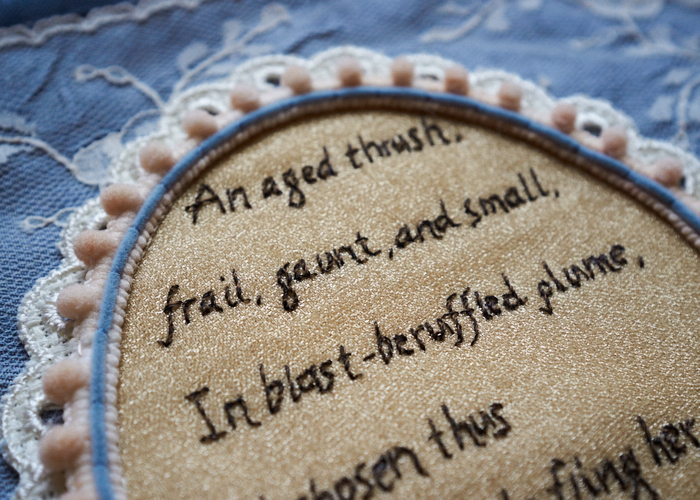
Now, back to the poem: Ann mentioned “The Darkling Thrush” by Thomas Hardy in 1900 here. The stanza she quoted struck me and is also my favorite from the poem. You may read the full verse here, and please note that I took creative license and changed the bird to a female.
I stitched on to an oval motif designed for counted work that I picked up from my embroidery guild. It has a nice scalloped edge and would be just the right size for what I imagined.

However, it was too white for my liking, plus I didn’t want to do counted letters, so I added a layer of sparkly golden sheer fabric on top, with some interfacing behind the oval. I used tracing paper as my stencil, which left some suspense whilst stitching because I could not exactly see if my stem stitches were where they needed to be. I used very fine thread that alternated between black and brown and very tiny stitches. When the paper was carefully removed, I only had to correct a few letters with teeny couching stitches.
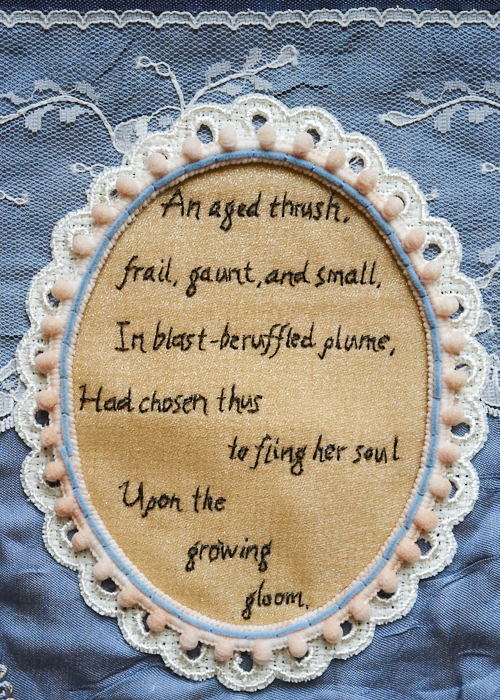
After stitching the letters, I secured the fabric all around the inner oval and then carefully cut the fabric back. The transition from the gold to the white scallops was too bare, so I first added the layer of small pompom trim. That still didn’t seem to dull the white and tie in this motif to the rest of the piece, so I added a thin velvet rope as well. Had I thought of it before hand, I would have attempted to die the aida oval with tea, but alas, I create on whims more than on plans.
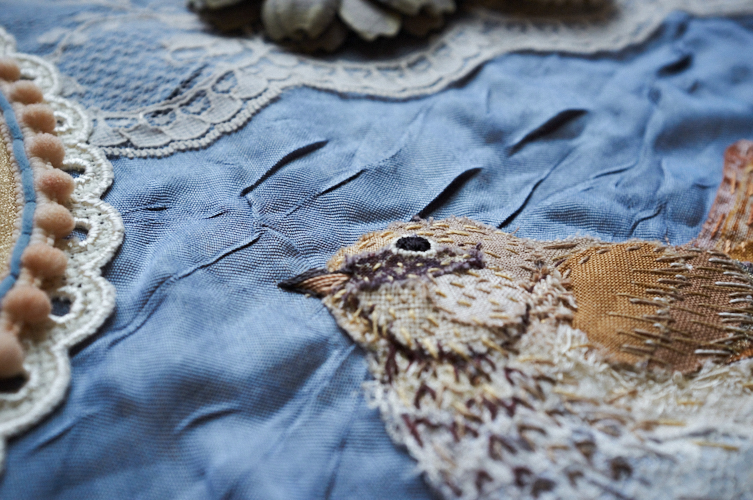
So by this stage, I had known I would be using this blue creased fabric that my wedding gown designer Joi Mahon had sent when we were originally talking choices. The other side of the fabric has a lovely golden sheen, which I used for the ground (I chose a piece with the selvage for the fluffy row of blue).
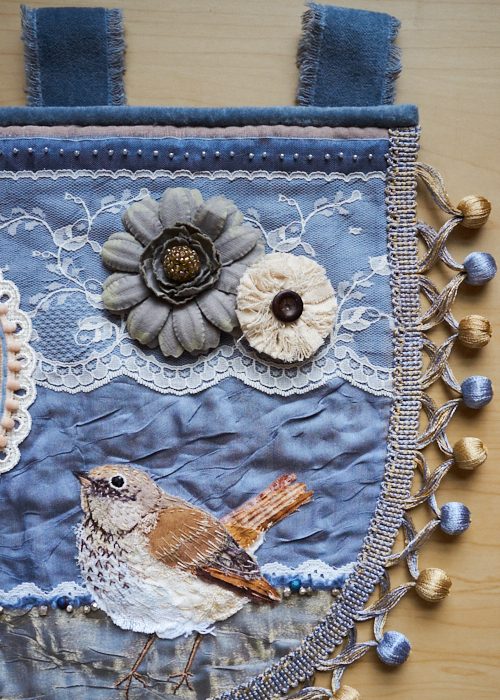
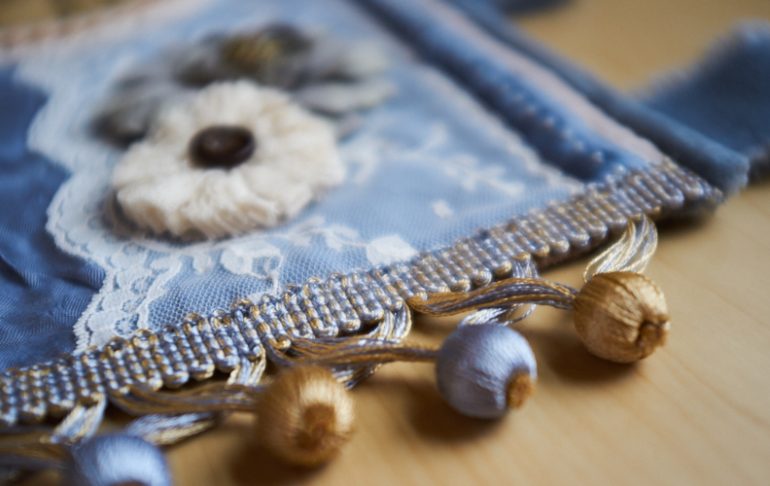
But other than that, all I had was a bird, a poem, and a background. It was too plain. I pulled out some lace fabric to mimic snow, and after much thought, found the right type of lacy and its placement at the top. This left a fairly bare area above the bird. Digging in my scrapping supplies, as I often do, I found a gorgeous steel blue paper flower with a beaded center, and a messy off-white flower that I felt lent itself to the scrappiness of the bird and feelings of winter.

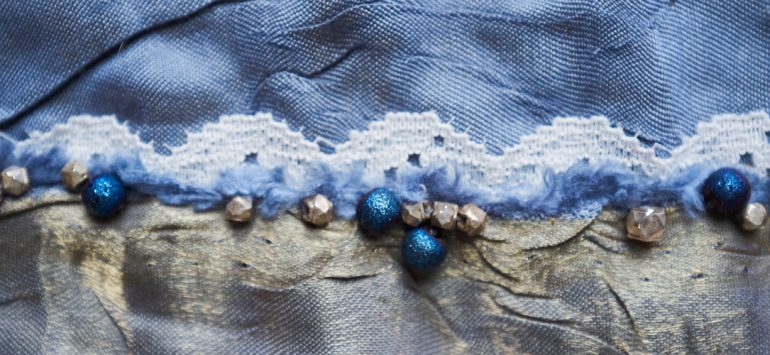
How the ground connected to the sky was kind of boring because the fluffy blue selvage didn’t pop out against the blue background. A strip of white lace trim fixed that, but I thought it was still too plain.
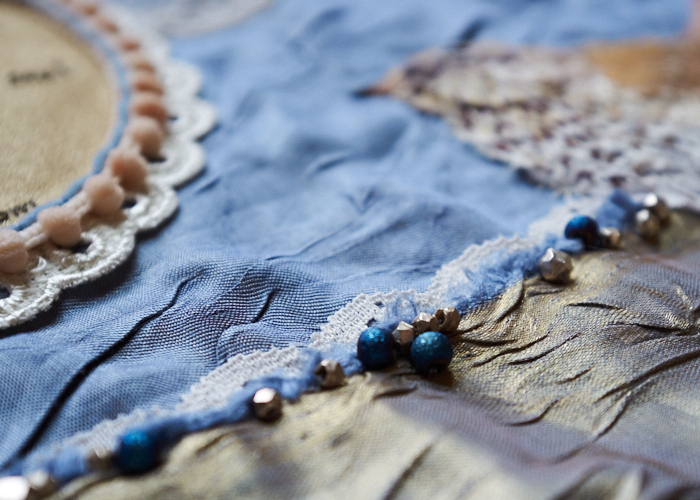
After digging through my beads, I added some “rocks” to the little humps of “snow”.
The top now seemed unfinished, which lead me to adding a strip of blue ribbon with tiny seed beads evenly spaced across it. As the project began coming fully together, it would be time to soon add the embroidered legs of the bird (mentioned earlier), so I attached everything to a felt backing, with the idea that the mushroom colored felt would act as a small ¼” frame all around the square piece. However, I ended up not liking that idea, but I did like the color at the top. But then, because this particular wool felt texture stood out, I toned it down with a gauzy white strip of trim tacked on with invisible stitches (which, as I happened to think about it, is my favorite stitch).
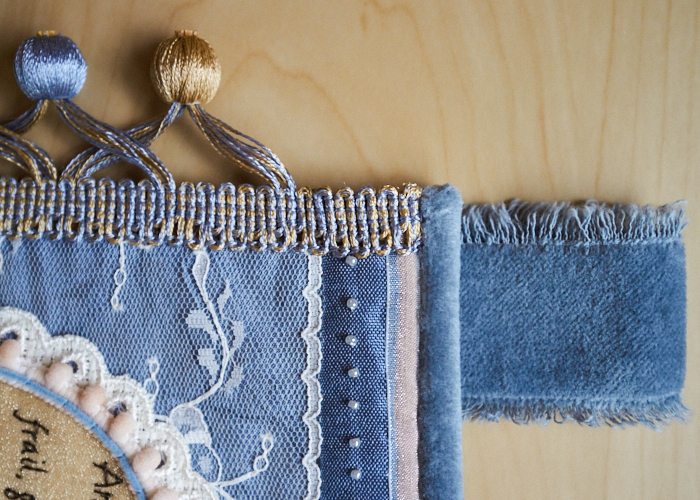
At this point, I did not like the bottom of the piece now. And on a whim, I cut it to be rounded. Egads, what was I thinking?! But I fell in love with it, and it reminded me of a medieval banner. I tested all my trims, and really liked a particular blue pompom one, but unfortunately as a vintage piece, it was covered in rust stains. Against my better nature, but for the good of the cause, I made a trip to the store. It was there I found this lovely upholstery trim that perfectly tied in the blues and browns – I couldn’t believe it! And it added to the richness and castle-ness I was dreaming of.
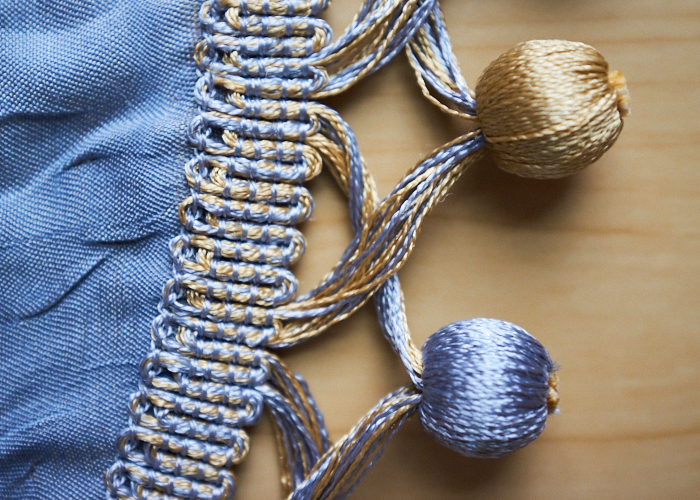
At the store, I also found a plain velvet rope edging I was able to add to across the top. And almost perfectly matching velvet ribbon, with just the right amount of fray, for the tabs to hang it. They are only stitched on as strips at the moment, and pinned as loops, because I don’t know yet what kind of rod I will have. I imagine either a nice looking stick or driftwood length, or maybe a metal rod designed for embroidered panels.
In these close-up photos, I found some spots I needed to fix (like the blue velvet rope around the poem), so I think they are all taken care of by now; I just didn’t want the hassle of re-photographing them because I’m more interested in real life than a perfect digital one;) Now that I am carving weeknight time (after a long work day) to stitch simple things like the EPP hexies for my Hexie Dreams quilt, and weekend time for more intensive stitching like Stitch Club, you can see why I think 2022 has plenty of time for creativity. I am very curious to see how I fair in 2022!
je vous admire vos oeuvres sont si naturelles merci et continuez
Aw, merci beaucoup! Je suis ravie que vous admiriez mon travail:)
Felicitaciones, es una verdadera obra de arte, un trabajo absolutamente bien pensando y limpia Mamen té ejecutado.
Un saludo desde Bogotá, Colombia.
Gracias, Héctor!