
TextileArtist.org‘s Stitch Club workshop was recently led by Cassandra Dias who makes embroidered landscapes. Across the years, I’ve certainly admired seeing people’s landscapes, but never attempted my own. You see, I thought it would be one of those projects that takes much too long to complete for my level of patience, priority, and engagement (read as: I thought I would get bored). However, with a recent game day scheduled and no small hand project in site, I figured Cassandra’s would be perfect – I could work on it at the table, month after month, until it was eventually complete. Joke’s on me; once I started, I didn’t want to stop – and it didn’t take nearly as long as I thought it might.
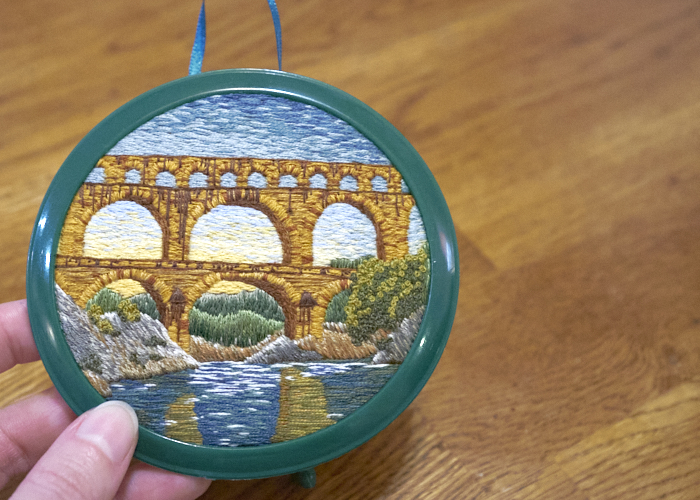
It helps tremendously that Cassandra suggested a 3″ circle, of course! She showed how she designed imaginary landscapes, but suggested we could just as well have a photo reference. Because I had mistakenly believed this project would take up a really large chunk of my time, I decided to pick a photo that held meaning for me, and therefore what you see is the Pont Du Gard in France, an aqueduct that Boy and I visited when we got married.
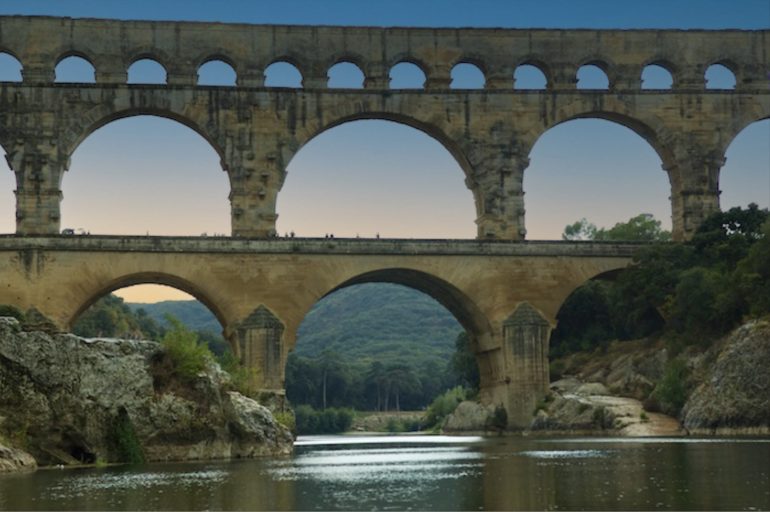
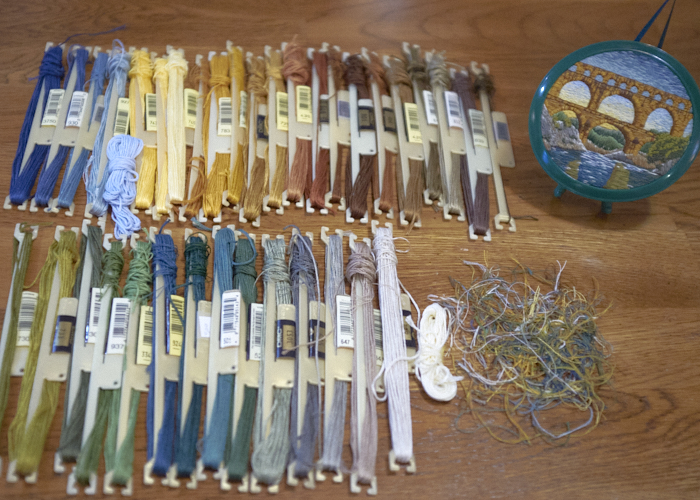
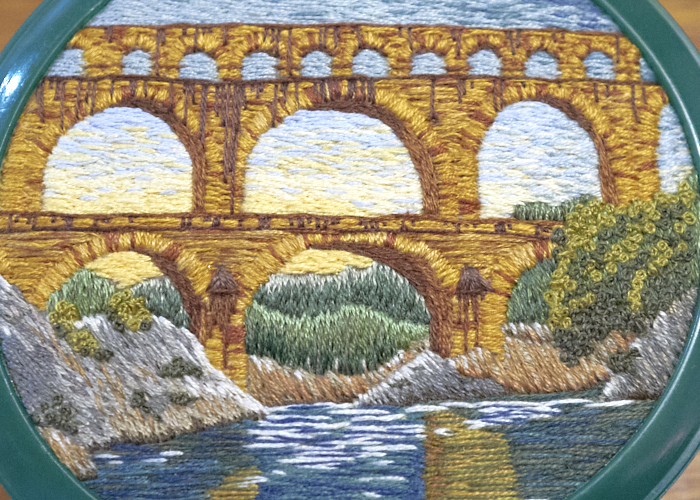
The day was actually a little overcast (and drizzly), but I used photoshop to reimagine the sky. You can see the original photo in this post. I also posterized it to try to determine how many colors I might need, at least as a start. Boy, was I ever wrong about that! I think I began with something like 10. In the end, I had 38 threads pulled and stitched – I actually easily could have gone with more!
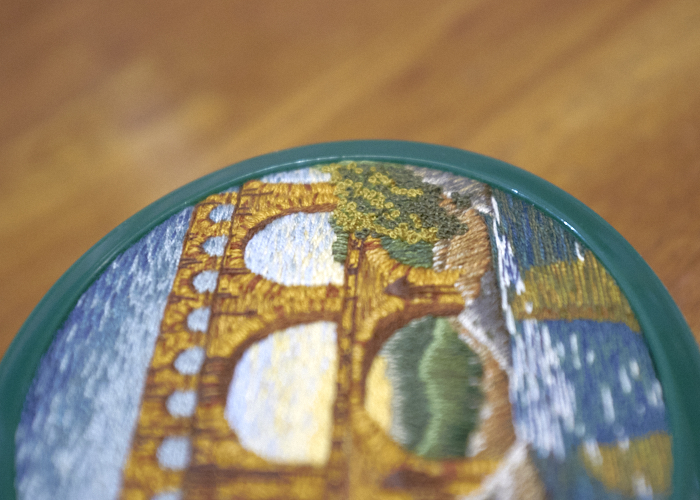
As with most things I do, I learned on the fly. I would have handled parts of this project differently if I had known prior. One of them would be to use multiple needles at one time, with multiple threads, and to use two threads as a base, then add single threads on top for blending and variation (which breaks with Cassandra’s technique and speaks to my own style, I suppose). You can see I did that with the water, but I did not do that with the sky, for comparison of the different looks. I would also be more organic with the direction of the threads. Sure, horizontal works great, or vertical, or slanted. But something with the ground bugs me – I should have made the rocks on the right angle opposite to the rocks on the left. Or, add that path from the original photo down on the right side with horizontal bits. All in all, just follow my gut rather than try to stick to a plan, if that makes sense.

I also did not opt to buy any threads, so I had to use the colors I had on hand. I wasn’t always in love with my options, but I made do and with no regrets. The colors I had for the aqueduct itself are the ones I find most irksome, but as the French do say – c’est la vie!
I also would have made my straight stitching more sparse in areas, so that I could then more easily keep adding colors and single strands later. Or more french knots. Technically, this project isn’t finished; I am finished with it though. If I wanted to spend more time, I would add single threads to the sky and smooth that out, and do something, anything, with the trees in the background. But my fingers are over it (though my gramma’s finger cots certainly saved the day! Those are now on order for future projects with intense stitching). Mix that with a couple disappointments here and there, and it was time to call it in.
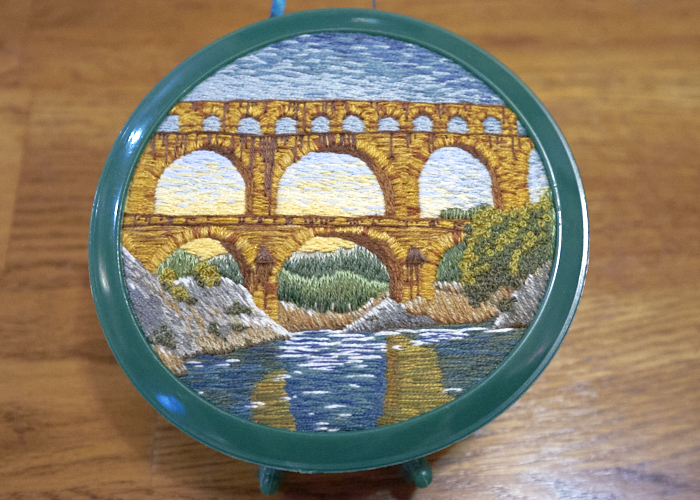
I wasn’t sold on adding the vertical lines to the aqueduct, except that it really brought the architecture to life, and this type of embroidery is best viewed from afar, afterall. You don’t get to see that here on the web, but trust me: from a longer viewing distance, it’s not too shabby, those lines! The only last complaint I have is minor like the rest – my 3″ circle was a little larger than 3″ technically, and I didn’t want to do the work to make it fit in a 4″ hoop. Lucky for me, I found this green hoop, but it is not meant for display (it does not lie flat against the wall because of the back ring handles). The color works, though, and more importantly, it fit! I’ll take it.
I absolutely would do this again. Towards the end, I was getting a bit lost in “painting with thread” which I think we can all agree is where I will some day end up, surely (let’s keep it real though – not the formal long and short stitching; I am more of an impressionist). I just have to keep practicing my patience, priority, and engagement muscles for the long haul required for me to be completely satisfied with a “real” project. I see that pattern: the longer I spend with a piece, the happier I am. But, I must balance that out currently with how quickly bored or dissatisfied I become. The struggle, as they say, is real.
Much thanks to Cassandra for making an embroidered landscape accessible and achievable! And please do check out her work – she has a brilliant eye for color, light, and shadow that translates so well into her embroidery work.
Wooden hoops can be easily painted with acrylic paints, tinted with watercolors, given a bit of a finish with shoe polish, dyed with food or Easter egg colors, It adds an extra touch to the hoop framing. But that green is perfect as it is.
Yes, I had planned to paint my hoop, but then didn’t have the right size available. This needed a 3.5″ hoop, which aren’t easy to come by. I looked into picture frames as well, but it still isn’t a common size, unfortunately. I don’t mind using what I have on hand, though, usually!