
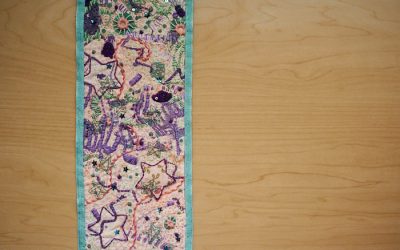
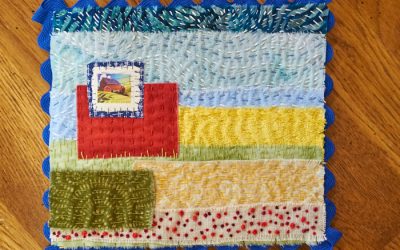
You know that I was working on my second crazy quilt block under the tutelage of Kathy Shawkl (check out my first here!). Well, I completed my beautiful disaster! And I do mean that, disaster.
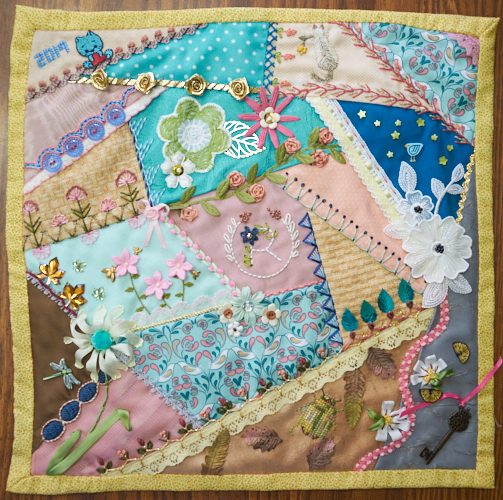
Yes, yes, it looks alright but for some reason when I pulled it off the hoop to add the backing, it got super warped! I am quite sad because I spent a lot of time preparing against that (or so I thought). I even used a stabilizer. My thought is that I simply over stretched it. Wah wah. I’m proceeding, undaunted, to Kathy’s next course, though!
This course was a lot about color and we were allowed to use trims so I loaded them up!
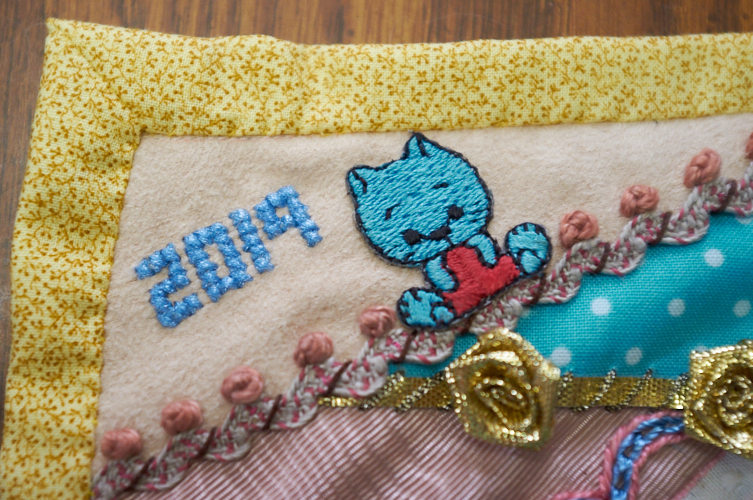
I used waste canvas for the first time, and dated my block 2019 with couched rickrack, big fat colonial knots, and a little cat patch. I also couched down some gold ribbon that had manufactured roses on it.
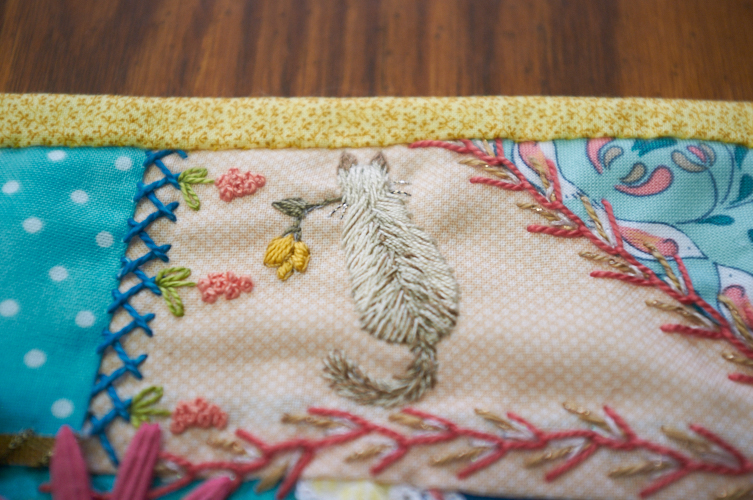
I used the herringbone stitch with some colonial knot flowers on the left and feather stitch in pink with white fly stitches nestled in, hugging golden straight stitches on the right and bottom (inspired by Sharon at Pintangle – I love her crazy quilt book!). I tried my hand at chunky thread painting to make a cat look like my most-amazing javanese kitties (I used a satin stitch template from 500 Simply Charming Designs for Embroidery that I’ve used previously for making buttons).
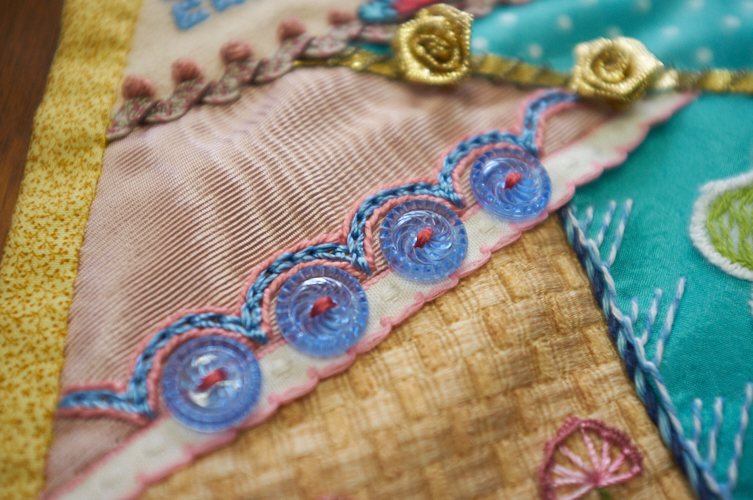
Scalloping chain stitch outlined with stem stitch hugs some buttons over a strip of white fabric ribbon.
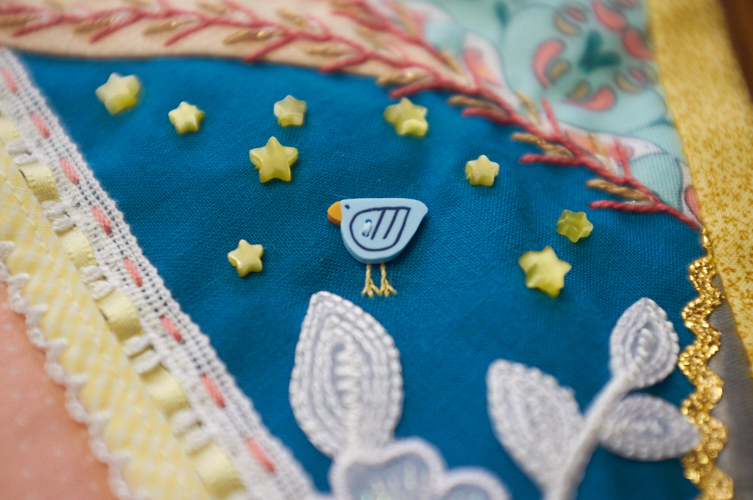
A strip of gold rickrack, and a piece of yellow and white ribbon tacked down with pink thread here, plus some tiny star beads and a little clay bird.
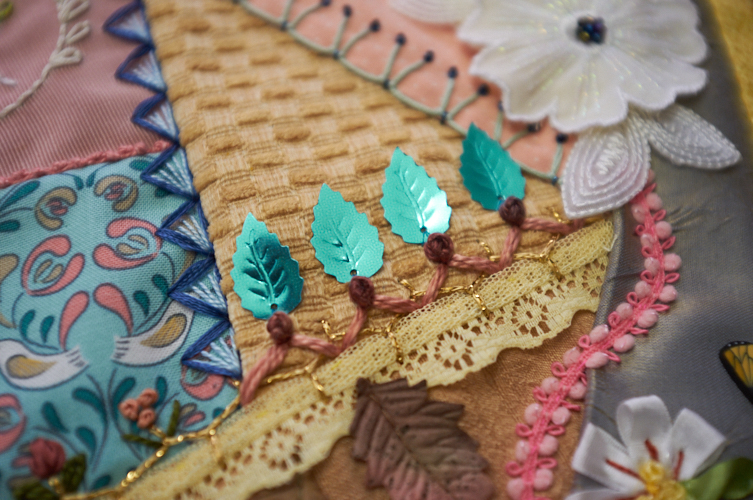
Glass leaf sequins above a strip of grey trim used for scrapbooking lined with a specialty pink metallic thread. Above them are some half-wheel buttonhole flowers edging a chevron stitch (the tall ones have straight stitch “leaves” and are buttonholed themselves in a darker color, though it isn’t easily seen in this image.
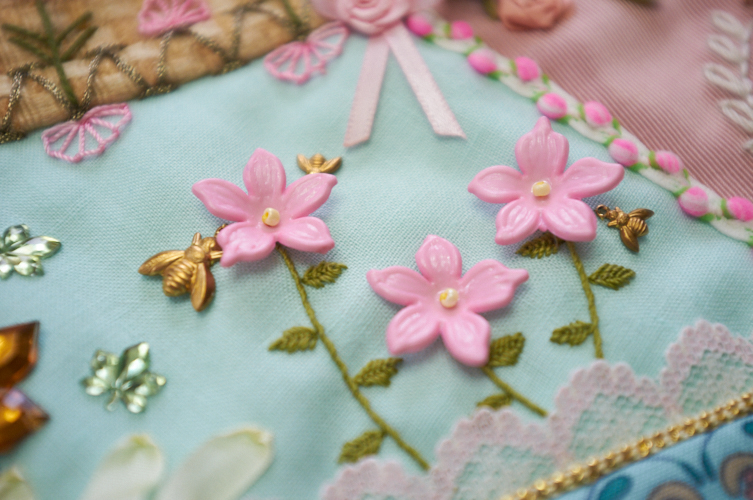
I really love this little vignette – the pink flowers came from a scrapbooking store, and they are secured with little yellow beads. I added some brass bees I picked up down south. The stems are whipped stem stitch and the leaves are stacked fly stitches. This was my first attempt for fly stitch leaves – easy and awesome!
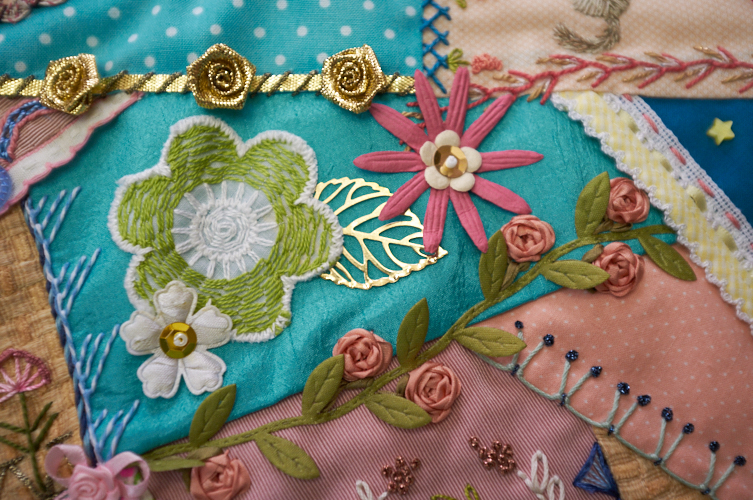
A green flower patch with golden metal leaf, a tiny white flower with a sequin and a bead, and some paper flowers picked up from a scrapbooking store. These rest above a strip of leafed trim with woven ribbon roses on green fly-stitch bases. There is a little manufactured ribbon rose bow on the left end of it (hard to see here), below a couched blue-on-blue cord and stacked one-sided feather stitches of a thin white and blue cord. I used the up and down button hole stitch in blue along the pink fabric, and added colonial knots and tacking in a darker metallic thread.
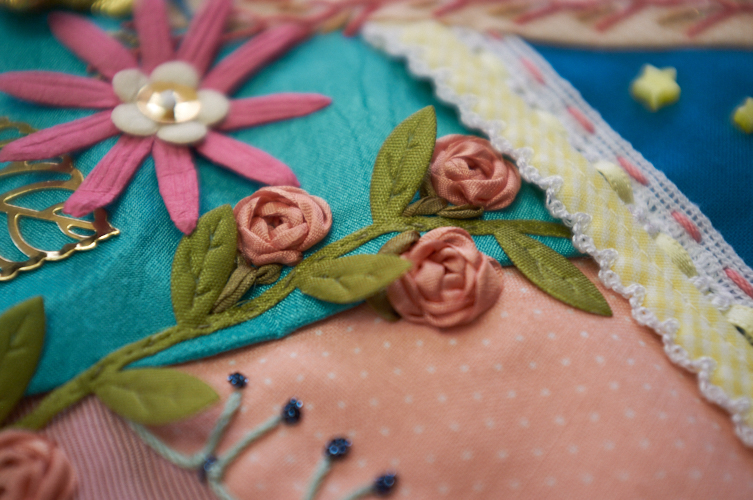
Woven ribbon roses are my favorite thing I think! Just saying…
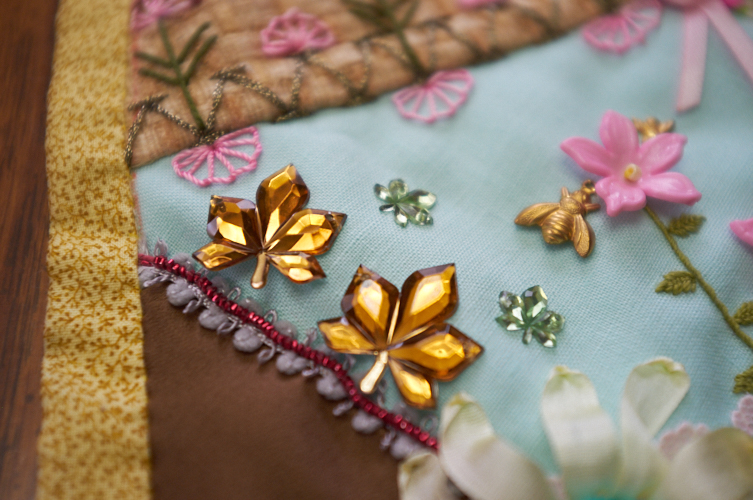
I had pocketed a few leaf sequins from a wedding table once and the colors matched wonderfully. They sit above fat colonial knots and straight stitches that perch on top of a gold cretan stitch running along a strip of yellow lace. I don’t know why, but I am really proud of the blue triangles! Weird right? So simple – the dark blue are straight stitches and then I filled them in with light blue straight stitches at angles from one corner. I just love that look! The pink strip is more of the scrapbooking ribbon that I simply added a curve to.
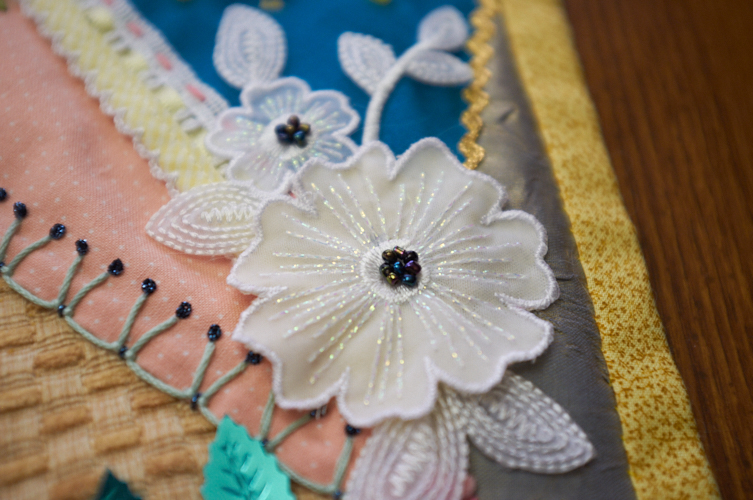
This white flower is an iron-on lace motif, that I tacked fabric behind so the larger flower would not be see-through (like the rest of it). A cluster of blueish-purplish seeds finish them off.
More paper flowers, one with a clear gem sequin, two with teeny buttons, and one with a bead. They sit at the intersection of a precious little ribbon piece with puffy pink balls and green strips that remind me of flowers. To the right of the cluster is a line of coral stitch with perle cotton. To their left is a golden cord tucking down a strip of white hem lace with a pink edge.
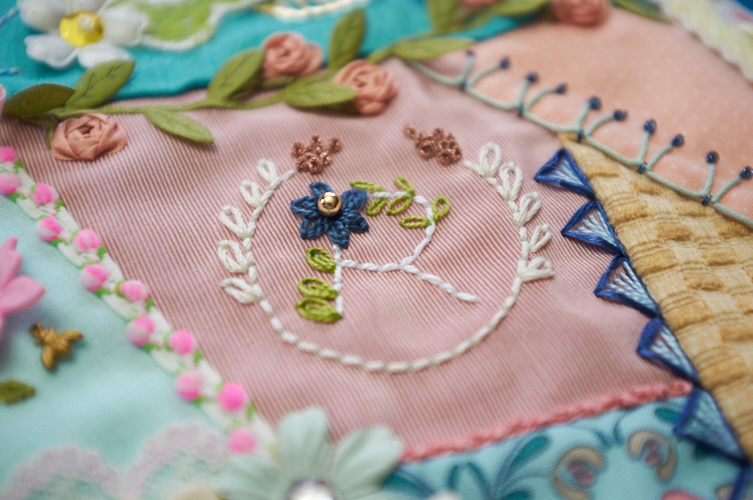
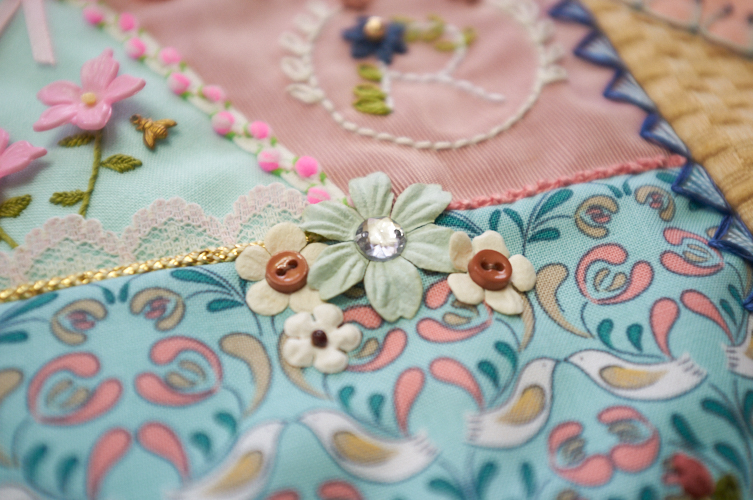
Rather than sign the block with my initials, I decided to make a monogram (also from the 500 Simply Charming Designs book). I added a wreath around it, and tacked on a gold bead and some colonial knots in a pink metallic thread.
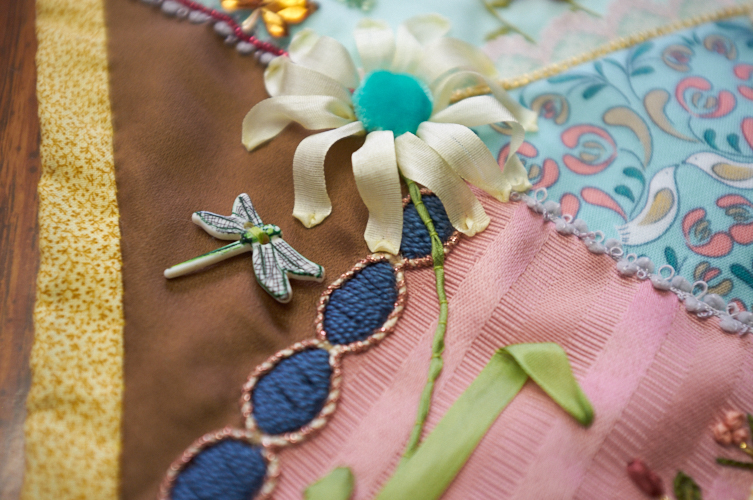
I was super excited to try this technique, which I learned on Craftsy. I had some luscious blue velvet left over from my Sue Spargo course (aka my butterfly pillow) that I padded with batting, and then loosely looped ribbon petals around it. A dragonfly button adds a little green to match the ribbon stem and leaf. The seam embellishment is satin ovals outlined with a couched cord.
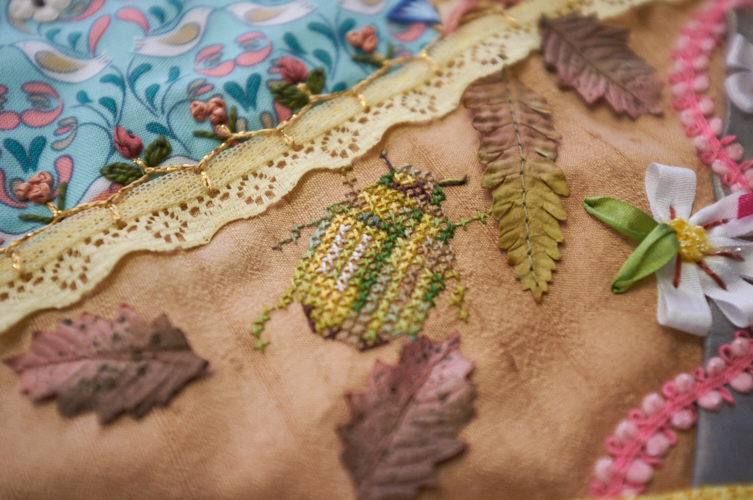
I struggled a lot with this patch of fabric, as I needed to cover it with something to keep its plain-ness from sticking out, but something not so bold as to draw the eye too much (the class also worked on balancing). Enter that 500 Simply Charming Designs book again! I used waste canvas and made this stellar beetle. Then added some leaves found at – you guessed it! – a scrapbooking shop. I couldn’t be more pleased with how it balanced!
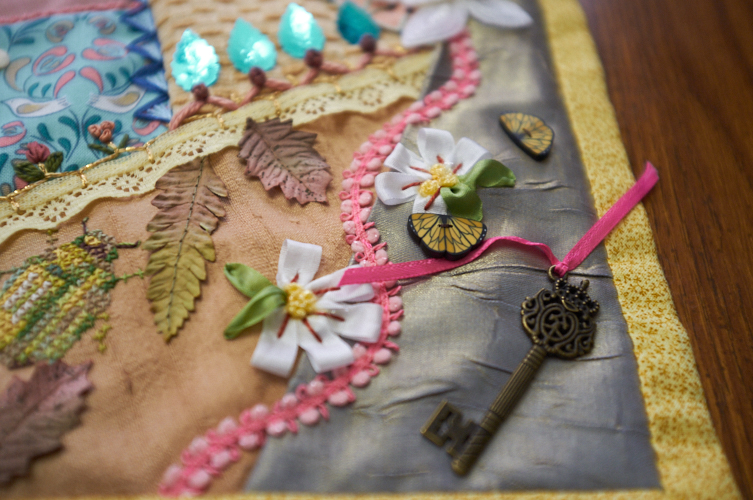
This final corner was meant to have violets, but purple stood out like a sore thumb. I googled violets and found they do come in white! Mine didn’t turn out as well as I would have liked, but I added clay butterfly buttons and a metal key with a ribbon embellishment just to top it all off. I’m fine with how it looks.
So, anyway, the whole thing is a bit wonky now, and not too square either, but I can’t expect perfection when I’ve only just completed my second crazy quilt block, now can I? It was a great experience and except for that, I really do like it!


These are beautiful and look like so much fun to make! What a great way to put to use all those bits and baubles we crafters tend to collect and “stash away” (aka: hoard).
I’m sorry to hear it warped. :0[ To me, it looks charming and handmade, but if it’s bothersome to you, maybe you could have it mounted to a mat and framed? There are so many pretty details to see, and it would be a lovely piece of wall art.
Thank you, Michelle! Everyone has been so complimentary on it, I decided to hang it on my craft room wall anyway. It is a blast to bust into my hoard – and justifies the continued efforts to grow it, teehee! 😀